codis安装及配置
一、环境安装
系统环境centos
Golang 环境搭建: yum install go
codis 下载和编译:
go get -u -d github.com/CodisLabs/codis
cd $GOPATH/src/github.com/CodisLabs/codis
make
make gotest
mkdir -p /usr/local/codis/{logs,conf,scripts}
cp –rf bin /usr/local/codis/
cp config.ini /usr/local/codis/conf/
Codis-HA 编译
Codis-HA。这是一个通过 Codis 开放的 api 实现自动切换主从的工具。该工具会在检测
到 master 挂掉的时候将其下线并选择其中一个 slave 提升为 master 继续提供服务。
go get github.com/ngaut/codis-ha
cd codis-ha
go build
codis-ha –codis-config=localhost:18087 –productName=testZookeeper集群搭建
首先安装开发工具及openjdk,zookeeper是由Java语言开发的,所以需要openjdk环境。
首先安装开发工具及openjdk,zookeeper是由Java语言开发的,所以需要openjdk环境。
1 | yum groupinstall "Development tools" "Compatibility libraries" -y |
确定Java运行环境正常
1 | java -version |
安装二进制版本的zookeeper
1 | tar xvf zookeeper-3.4.9.tar.gz -C /usr/local/ |
编译zookeeper配置文件/usr/local/zookeeper/conf/zoo.cfg
1 | maxClientCnxns=60 |
1 | mkdir /data/zookeeper/{db,log} -p |
其中2888表示zookeeper程序监听端口,3888表示zookeeper选举通信端口。
下面需要生成ID,这里需要注意,myid对应的zoo.cfg的server.ID,比如第二台zookeeper主机对应的myid应该是2,以此类推,三个主机分别为:
1 | 10.173.225.60 echo 1 > /data/zookeeper/db/myid |
然后输出环境变量。
1 | export PATH=$PATH:/usr/local/zookeeper/bin/ |
然后就可以启动zookeeper了。
1 | zkServer.sh start |
查看各个zookeeper节点的状态(会有一个leader节点,两个follower节点)。
1 | [root@node1 ~]# zkServer.sh status |
客户端连接,可以查看相关信息。
1 | zkCli.sh -server 127.0.0.1:2181 |
至此,zookeeper已经搞定了。
二、启动服务
再编译后的codis文件夹下有启动服务的脚本
启动codis-dashboard
使用 codis-dashboard-admin.sh 脚本启动 dashboard,并查看 dashboard 日志确认启动是否有异常。
dashboard只需要启动一个
配置文件dashboard.toml
1 | # Set Coordinator, only accept "zookeeper" & "etcd" & "filesystem". |
1 | ./admin/codis-dashboard-admin.sh start |
启动codis-fe
1 | ./bin/codis-admin --dashboard-list --zookeeper=127.0.0.1:2181 | tee $Gopath/src/github.com/CodisLabs/codis/config/codis.json |
codis.json
1 | [ |
启动codis-fe
1 | nohup `which codis-fe` --ncpu=2 --log=/data/codis/log/fe.log --log-level=WARN |
启动codis-proxy
使用 codis-proxy-admin.sh 脚本启动 codis-proxy,并查看 proxy 日志确认启动是否有异常。(代理可以启动一个,也可以启动多个,但是启动的多个代理的配置必须是一样的,是同一个dashboard的地址)
配置文件proxy.toml
19 # Set bind address for admin(rpc), tcp only.
20 admin_addr = “10.173.225.60:11080”
21
22 # Set bind address for proxy, proto_type can be “tcp”, “tcp4”, “tcp6”, “unix” or “unixpacket”.
23 proto_type = “tcp4”
24 proxy_addr = “10.173.225.60:19000”
26 # Set jodis address & session timeout
27 # 1. jodis_name is short for jodis_coordinator_name, only accept “zookeeper” & “etcd”.
28 # 2. jodis_addr is short for jodis_coordinator_addr
29 # 3. jodis_auth is short for jodis_coordinator_auth, for zookeeper/etcd, “user:password” is accepted.
30 # 4. proxy will be registered as node:
31 # if jodiscompatible = true (not suggested):32 # /zk/codis/db{PRODUCT_NAME}/proxy-{HASHID} (compatible with Codis2.0)
33 # or else
34 # /jodis/{PRODUCT_NAME}/proxy-{HASHID}
35 jodis_name = “”
3 # jodis_addr不能写地址,不然启动报错,不知道为啥,可能没有安装jodis,
36 jodis_addr = “”
37 jodis_auth = “”
38 jodis_timeout = “20s”
1 | ./admin/codis-proxy-admin.sh start |
要启动多个代理需要修改脚本
vi codis-proxy-admin.sh
1 | CODIS_DASHBOARD_ADDR="10.173.225.60:18080" |
启动codis-server
使用 codis-server-admin.sh 脚本启动 codis-server,并查看 redis 日志确认启动是否有异常。
配置redis.conf 和sentinel.conf
redis.conf
48 # bind 127.0.0.1 ::1
49 #
50 # WARNING If the computer running Redis is directly exposed to the
51 # internet, binding to all the interfaces is dangerous and will expose the
52 # instance to everybody on the internet. So by default we uncomment the
53 # following bind directive, that will force Redis to listen only into
54 # the IPv4 lookback interface address (this means Redis will be able to
55 # accept connections only from clients running into the same computer it
56 # is running).
57 #
58 # IF YOU ARE SURE YOU WANT YOUR INSTANCE TO LISTEN TO ALL THE INTERFACES
59 # JUST COMMENT THE FOLLOWING LINE.
60 # ~~
61 bind 0.0.0.0
…….
…….
82 # Accept connections on the specified port, default is 6379 (IANA #815344).
83 # If port 0 is specified Redis will not listen on a TCP socket.
84 port 6379
sentinel.conf
48 # bind 127.0.0.1 ::1
49 #
50 # WARNING If the computer running Redis is directly exposed to the
51 # internet, binding to all the interfaces is dangerous and will expose the
52 # instance to everybody on the internet. So by default we uncomment the
53 # following bind directive, that will force Redis to listen only into
54 # the IPv4 lookback interface address (this means Redis will be able to
55 # accept connections only from clients running into the same computer it
56 # is running).
57 #
58 # IF YOU ARE SURE YOU WANT YOUR INSTANCE TO LISTEN TO ALL THE INTERFACES
59 # JUST COMMENT THE FOLLOWING LINE.
60 #~~
61 bind 0.0.0.0
…….
…….
82 # Accept connections on the specified port, default is 6379 (IANA #815344).
83 # If port 0 is specified Redis will not listen on a TCP socket.
84 port 26379
1 | ./admin/codis-server-admin.sh start |
redis.conf 配置中 pidfile、logfile 默认保存在 /tmp 目录,若启动失败,请检查当前用户是否有该目录的读写权限。
通过fe添加group
通过web浏览器访问集群管理页面(fe地址:127.0.0.1:8080) 选择我们刚搭建的集群 codis-demo,在 Proxy 栏可看到我们已经启动的 Proxy, 但是 Group 栏为空,因为我们启动的 codis-server 并未加入到集群 添加 NEW GROUP,NEW GROUP 行输入 1,再点击 NEW GROUP 即可 添加 Codis Server,Add Server 行输入我们刚刚启动的 codis-server 地址,添加到我们刚新建的 Group,然后再点击 Add Server 按钮即可,如下图所示
通过fe初始化slot
新增的集群 slot 状态是 offline,因此我们需要对它进行初始化(将 1024 个 slot 分配到各个 group),而初始化最快的方法可通过 fe 提供的 rebalance all slots 按钮来做,如下图所示,点击此按钮,我们即快速完成了一个集群的搭建。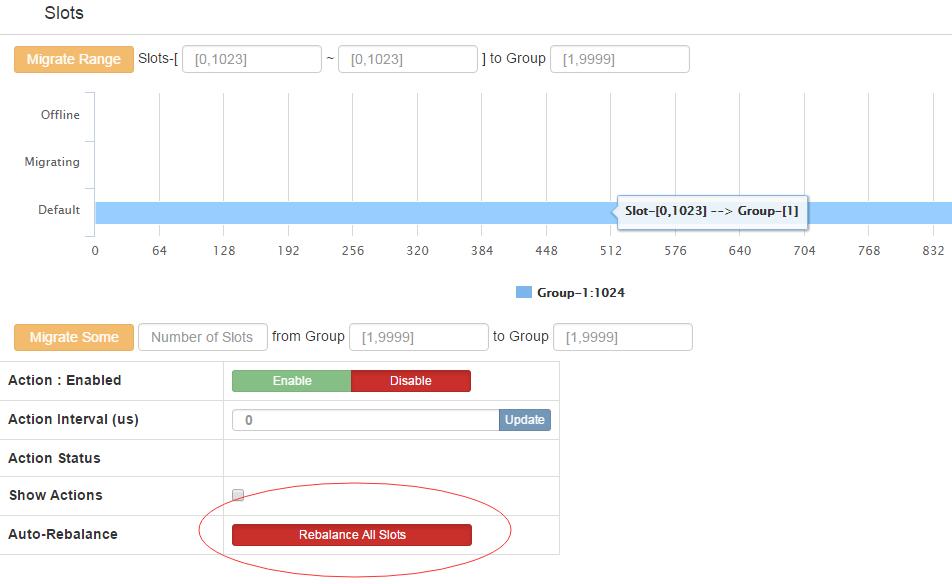
每次增加组之后就需要重新执行Rebalance All Slots